
This tutorial will show you how to build a slide-out navigation panel, which is a popular alternative to using a UINavigationController or a UITabBarController that allows users to slide content on or off screen.

The slide-out navigation panel design pattern lets developers add permanent navigation to their apps without taking up valuable screen real estate. The user can choose to reveal the navigation at any time, while still seeing their current context.
In this tutorial you’ll take a less-is-more approach so you can apply the slide-out navigation panel technique to your own applications with relative ease.
Getting Started
You’re going to build a slide-out navigation panel into a cute kitten and puppy photo browser. To get started, download the starter project for this tutorial. It’s a zip file, so save it to a convenient location and then extract it to get the project.
Next open the project in Xcode and take a look at how it’s organized. The Assets folder contains a couple of asset catalogs of all of the kitten and puppy images that’ll be displayed in the app. Notice too there’s three main view controllers. When the time comes to adapt this tutorial to your own projects, here’s what you should keep in mind:
- ContainerViewController: This is where the magic happens! This contains the views of the left, center, and right view controllers and handles things like animations and swiping. In this project, it’s created and added to the window in application(_:didFinishLaunchingWithOptions:) in AppDelegate.swift
- CenterViewController: The center panel. You can replace it with your own view controller (make sure you copy the button actions).
- SidePanelViewController: Used for the left and right side panels. This could be replaced with your own view controller.
The views for the center, left, and right view controllers are all defined within Main.storyboard, so feel free to take a quick look to get an idea of how the app will look.
Now you’re familiar with the structure of the project, it’s time to start at square one: the center panel.
Finding Your Center
In this section, you’re going to place the CenterViewController inside the ContainerViewController, as a child view controller.
Note: This section uses a concept called View Controller Containment introduced in iOS 5. If you’re new to this concept, check out Chapter 22 in iOS 5 by Tutorials, “UIViewController Containment.”
Open ContainerViewController.swift. At the bottom of the file there’s a small extension for UIStoryboard. It adds a few static methods which make it a bit more concise to load specific view controllers from the app’s storyboard. You’ll make use of these methods soon.
Add a couple of properties to ContainerViewController for the CenterViewController and for a UINavigationController, above viewDidLoad():
var centerNavigationController: UINavigationController!
var centerViewController: CenterViewController!
Note: These are implicitly-unwrapped optionals (as denoted by the !). They have to be optional because their values won’t be initialized until after init() has been called, but they can be automatically unwrapped because once they’re created you know they will always have values.
Next, add the following block of code to viewDidLoad(), beneath the call to super:
centerViewController = UIStoryboard.centerViewController()
centerViewController.delegate = self

// wrap the centerViewController in a navigation controller, so we can push views to it
// and display bar button items in the navigation bar
centerNavigationController = UINavigationController(rootViewController: centerViewController)
view.addSubview(centerNavigationController.view)
addChildViewController(centerNavigationController)

centerNavigationController.didMove(toParentViewController: self)
The code above creates a new CenterViewController and assigns it to the centerViewController property you just created. It also creates a UINavigationController to contain the center view controller. It then adds the navigation controller’s view to ContainerViewController‘s view and sets up the parent-child relationship using addSubview(_:), addChildViewContoller(_:) and didMove(toParentViewController:).
It also sets the current view controller as the center view controller’s delegate. This will be used by the center view controller to tell its container when to show and hide the left and right side panels.
If you try to build now, you’ll see an error when the code assigns the delegate. You need to modify this class so it implements the CenterViewControllerDelegate protocol. You’ll add an extension to ContainerViewControllerto implement it. Add the following code above the UIStoryboard extension near the bottom of the file (this also includes a number of empty methods which you’ll fill out later):
// MARK: CenterViewController delegate

extension ContainerViewController: CenterViewControllerDelegate {

  func toggleLeftPanel() {
  }

  func toggleRightPanel() {
  }

  func addLeftPanelViewController() {
  }

  func addRightPanelViewController() {
  }

  func animateLeftPanel(shouldExpand: Bool) {
  }

  func animateRightPanel(shouldExpand: Bool) {
  }
}
Now is a good time to check your progress. Build and run the project. If all went well, you should see something similar to the screen below:

Yes, those buttons at the top will eventually bring you kitties and puppies. What better reason could there be for creating sliding navigation panels? But to get your cuteness fix, you’ve got to start sliding. First, to the left!
Kittens to the Left of Me…
You’ve created your center panel, but adding the left view controller requires a different set of steps. There’s quite a bit of set up to get through here, so bear with it. Think of the kittens!
To expand the left menu, the user will tap on the Kitties button in the navigation bar. So head on over to CenterViewController.swift.
In the interests of keeping this tutorial focused on the important stuff, the IBActions and IBOutlets are pre-connected for you in the storyboard. However, to implement your DIY slide-out navigation panel, you need to understand how the buttons are configured.
Notice there’s already two IBAction methods, one for each of the buttons. Find kittiesTapped(_:) and add the following implementation to it:
delegate?.toggleLeftPanel?()
As previously mentioned, the method is already hooked up to the Kitties button.
This uses optional chaining to only call toggleLeftPanel() if delegate has a value and it has implemented the method.
You can see the definition of the delegate protocol in CenterViewControllerDelegate.swift. As you’ll see, there’s optional methods toggleLeftPanel() and toggleRightPanel(). If you remember, when you set up the center view controller instance earlier, you set its delegate as the container view controller. Time to go and implement toggleLeftPanel().
Note: For more information on delegate methods and how to implement them, please refer to Apple’s Developer Documentation.
Open ContainerViewController.swift. First add an enum to the ContainerViewController class, right below the class name:
class ContainerViewController: UIViewController {

  enum SlideOutState {
    case bothCollapsed
    case leftPanelExpanded
    case rightPanelExpanded
  }

// ...
This will let you keep track of the current state of the side panels, so you can tell whether neither panel is visible, or one of the left or right panels are visible.
Next, add two more properties below your existing centerViewController property:
var currentState: SlideOutState = .bothCollapsed
var leftViewController: SidePanelViewController?
These will hold the current state, and the left side panel view controller itself:
The current state is initialized to be .bothCollapsed – that is, neither of the side panels are visible when the app first loads. The leftViewController property is an optional, because you’ll be adding and removing the view controller at various times, so it might not always have a value.
Next, add the implementation for the toggleLeftPanel() delegate method:
let notAlreadyExpanded = (currentState != .leftPanelExpanded)

if notAlreadyExpanded {
  addLeftPanelViewController()
}

animateLeftPanel(shouldExpand: notAlreadyExpanded)
First, this method checks whether the left side panel is already expanded or not. If it’s not already visible, then it adds the panel to the view hierarchy and animates it to its ‘open’ position. If the panel is already visible, then it animates the panel to its ‘closed’ position.
Next, you’ll include the code to add the left panel to the view hierarchy. Locate addLeftPanelViewController(), and add the following code inside it:
guard leftViewController == nil else { return }

if let vc = UIStoryboard.leftViewController() {
  vc.animals = Animal.allCats()
  addChildSidePanelController(vc)
  leftViewController = vc
}
The code above first checks to see if the leftViewController property is nil. If it is, then creates a new SidePanelViewController, and sets its list of animals to display – in this case, cats!
Next, add the implementation for addChildSidePanelController(_:) below addLeftPanelViewController():
func addChildSidePanelController(_ sidePanelController: SidePanelViewController) {

  view.insertSubview(sidePanelController.view, at: 0)

  addChildViewController(sidePanelController)
  sidePanelController.didMove(toParentViewController: self)
}
This method inserts the child view into the container view controller. This is much the same as adding the center view controller earlier. It simply inserts its view (in this case it’s inserted at z-index 0, which means it will be belowthe center view controller) and adds it as a child view controller.
It’s almost time to try the project out again, but there’s one more thing to do: add some animation! It won’t take long!
And sliiiiiiide!
First, add a constant below your other properties in ContainerViewController.swift:
let centerPanelExpandedOffset: CGFloat = 60
This value is the width, in points, of the center view controller left visible once it has animated offscreen. 60 points should do it.
Next, locate the method stub for animateLeftPanel(shouldExpand:) and add the following block of code to it:
if shouldExpand {
  currentState = .leftPanelExpanded
  animateCenterPanelXPosition(
    targetPosition: centerNavigationController.view.frame.width - centerPanelExpandedOffset)

} else {
  animateCenterPanelXPosition(targetPosition: 0) { finished in
    self.currentState = .bothCollapsed
    self.leftViewController?.view.removeFromSuperview()
    self.leftViewController = nil
  }
}
This method simply checks whether it’s been told to expand or collapse the side panel. If it should expand, then it sets the current state to indicate the left panel is expanded, and then animates the center panel so it’s open. Otherwise, it animates the center panel closed and then removes its view and sets the current state to indicate it’s closed.
Finally, add animateCenterPanelXPosition(targetPosition:completion:) underneath animatedLeftPanel(shouldExpand:):
func animateCenterPanelXPosition(targetPosition: CGFloat, completion: ((Bool) -> Void)? = nil) {

  UIView.animate(withDuration: 0.5,
                 delay: 0,
                 usingSpringWithDamping: 0.8,
                 initialSpringVelocity: 0,
                 options: .curveEaseInOut, animations: {
      self.centerNavigationController.view.frame.origin.x = targetPosition
    }, completion: completion)
  }
This is where the actual animation happens. The center view controller’s view is animated to the specified position, with a nice spring animation. The method also takes an optional completion closure, which it passes on to the UIView animation. You can try tweaking the duration and spring damping parameters if you want to change the appearance of the animation.
OK… It’s taken a little while to get everything in place, but now is a great time to build and run the project. So do it!
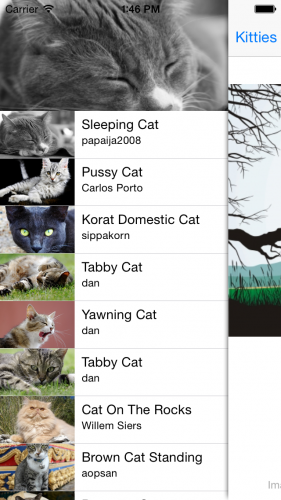
When you’ve run the project, try tapping on the Kitties button in the navigation bar. The center view controller should slide over – whoosh! – and reveal the Kitties menu underneath. D’aww, look how cute they all are.

But too much cuteness can be a dangerous thing! Tap the Kitties button again to hide them!
Me and my shadow
When the left panel is open, notice how it’s right up against the center view controller. It would be nice if there were a bit more of a distinction between them. How about adding a shadow?
Still in ContainerViewController.swift, add the following method below your animation methods:
func showShadowForCenterViewController(_ shouldShowShadow: Bool) {

  if shouldShowShadow {
    centerNavigationController.view.layer.shadowOpacity = 0.8
  } else {
    centerNavigationController.view.layer.shadowOpacity = 0.0
  }
}
This adjusts the opacity of the navigation controller’s shadow to make it visible or hidden. You can implement a didSet observer to add or remove the shadow whenever the currentState property changes.
Next, scroll to the top of ContainerViewController.swift and change the currentState declaration to:
var currentState: SlideOutState = .bothCollapsed {
  didSet {
      let shouldShowShadow = currentState != .bothCollapsed
      showShadowForCenterViewController(shouldShowShadow)
    }
}
The didSet closure will be called whenever the property’s value changes. If either of the panels are expanded, then it shows the shadow.
Build and run the project again. This time when you tap the kitties button, check out the sweet new shadow! Looks better, huh?
Up next, adding the same functionality but for the right side, which means… puppies!
Puppies to the Right…
To add the right panel view controller, simply repeat the steps for adding the left view controller.
Open ContainerViewController.swift, and add the following property below the leftViewController property:
var rightViewController: SidePanelViewController?
Next, locate toggleRightPanel(), and add the following implementation:
let notAlreadyExpanded = (currentState != .rightPanelExpanded)

if notAlreadyExpanded {
  addRightPanelViewController()
}

animateRightPanel(shouldExpand: notAlreadyExpanded)
Next, replace the implementations for addRightPanelViewController() and animateRightPanel(shouldExpand:) with the following:
func addRightPanelViewController() {

  guard rightViewController == nil else { return }

  if let vc = UIStoryboard.rightViewController() {
    vc.animals = Animal.allDogs()
    addChildSidePanelController(vc)
    rightViewController = vc
  }
}

func animateRightPanel(shouldExpand: Bool) {

  if shouldExpand {
    currentState = .rightPanelExpanded
    animateCenterPanelXPosition(
      targetPosition: -centerNavigationController.view.frame.width + centerPanelExpandedOffset)

  } else {
    animateCenterPanelXPosition(targetPosition: 0) { _ in
      self.currentState = .bothCollapsed

      self.rightViewController?.view.removeFromSuperview()
      self.rightViewController = nil
    }
  }
}
The code above is almost an exact duplicate of the code for the left panel, except of course for the differences in method and property names and the direction. If you have any questions about it, review the explanation from the previous section.
Just as before, the IBActions and IBOutlets have been connected in the storyboard for you. Similar to the Kitties button, the Puppies button is hooked up to an IBAction method named puppiesTapped(_:). This button controls the sliding of the center panel to reveal the right-side panel.
Finally, switch to CenterViewController.swift and add the following snippet to puppiesTapped(_:):
delegate?.toggleRightPanel?()
Again, this is the same as kittiesTapped(_:), except it’s toggling the right panel instead of the left.
Time to see some puppies!
Build and run the program again to make sure everything is working. Tap on the Puppies button. Your screen should look like this:

Looking good, right? But remember, you don’t want to expose yourself to the cuteness of puppies for too long, so tap that button again to hide them away.
You can now view both kitties and puppies, but it would be great to be able to view a bigger picture of each one, wouldn’t it? MORE CUTENESS :]
Pick An Animal, Any Animal
The kitties and puppies are listed within the left and right panels. These are both instances of SidePanelViewController, which essentially just contain table views.
Head over to SidePanelViewControllerDelegate.swift to take a look at the SidePanelViewControllerdelegate method. A side panel’s delegate can be notified via this method whenever an animal is tapped. Let’s use it!
In SidePanelViewController.swift, first add an optional delegate property at the top of the class, underneath the table view IBOutlet:
var delegate: SidePanelViewControllerDelegate?
Then fill in the implementation for tableView(_:didSelectRowAt:) within the UITableViewDelegate extension:
func tableView(_ tableView: UITableView, didSelectRowAt indexPath: IndexPath) {
  let animal = animals[indexPath.row]
  delegate?.didSelectAnimal(animal)
}
If there’s a delegate set, this will tell it an animal has been selected. Currently there’s no delegate yet! It would make sense for CenterViewController to be the side panel’s delegate, as it can then display the selected animal photo and title.
Open up CenterViewController.swift to implement the delegate protocol. Add the following extension to the bottom of the file, beneath the existing class definition:
extension CenterViewController: SidePanelViewControllerDelegate {

  func didSelectAnimal(_ animal: Animal) {
    imageView.image = animal.image
    titleLabel.text = animal.title
    creatorLabel.text = animal.creator

    delegate?.collapseSidePanels?()
  }
}
This method simply populates the image view and labels in the center view controller with the animal’s image, title, and creator. Then, if the center view controller has a delegate of its own, you can tell it to collapse the side panel away so you can focus on the selected item.
collapseSidePanels() is not implemented yet. Open, ContainerViewController.swift and add the following method below toggleRightPanel():
func collapseSidePanels() {

  switch currentState {
    case .rightPanelExpanded:
      toggleRightPanel()
    case .leftPanelExpanded:
      toggleLeftPanel()
    default:
    	break
  }
}
The switch statement in this method simply checks the current state of the side panels, and collapses whichever one is open (if any!).
Finally, update addChildSidePanelViewController(_:) to the following implementation:
func addChildSidePanelController(_ sidePanelController: SidePanelViewController) {
  sidePanelController.delegate = centerViewController
  view.insertSubview(sidePanelController.view, at: 0)

  addChildViewController(sidePanelController)
  sidePanelController.didMove(toParentViewController: self)
}
In addition to what it was doing previously, the method will now set the center view controller as the side panels’ delegate.
That should do it! Build and run the project again. View kitties or puppies, and tap on one of the cute little critters. The side panel should collapse itself again and you should see the details of the animal you chose.

Move Your Hands Back and Forth
The navigation bar buttons are great, but most apps also allow you to “swipe” to open the side panels. Adding gestures to your app is surprisingly simple. Don’t be intimated; you’ll do fine!
Open ContainerViewController.swift and locate viewDidLoad(). Add the following to the end of the method:
let panGestureRecognizer = UIPanGestureRecognizer(target: self, action: #selector(handlePanGesture(_:)))
centerNavigationController.view.addGestureRecognizer(panGestureRecognizer)
The above code defines a UIPanGestureRecognizer and assigns handlePanGesture(_:) to it to handle any detected pan gestures. (You will write the code for that method in a moment.)
By default, a pan gesture recognizer detects a single touch with a single finger, so it doesn’t need any extra configuration. You just need to add the newly created gesture recognizer to centerNavigationController view.
Note: Refer to our Using UIGestureRecognizer with Swift Tutorial for more information about gesture recognizers in iOS.
Next make this class a UIGestureRecognizerDelegate by adding the following extension at the bottom of the file, above the UIStoryboard extension:
// MARK: Gesture recognizer

extension ContainerViewController: UIGestureRecognizerDelegate {

  @objc func handlePanGesture(_ recognizer: UIPanGestureRecognizer) {
  }
}
Didn’t I tell you it’d be simple? There’s only one move remaining in your slide-out navigation panel routine.
Now Move That View!
The gesture recognizer calls handlePanGesture(_:) when it detects a gesture. So your last task for this tutorial is to implement the method.
Add the following block of code to the method stub you just added above (it’s a big one!):
let gestureIsDraggingFromLeftToRight = (recognizer.velocity(in: view).x > 0)

  switch recognizer.state {

    case .began:
      if currentState == .bothCollapsed {
        if gestureIsDraggingFromLeftToRight {
          addLeftPanelViewController()
        } else {
          addRightPanelViewController()
        }

        showShadowForCenterViewController(true)
      }

  case .changed:
    if let rview = recognizer.view {
      rview.center.x = rview.center.x + recognizer.translation(in: view).x
      recognizer.setTranslation(CGPoint.zero, in: view)
    }

  case .ended:
    if let _ = leftViewController,
      let rview = recognizer.view {
      // animate the side panel open or closed based on whether the view
      // has moved more or less than halfway
      let hasMovedGreaterThanHalfway = rview.center.x > view.bounds.size.width
      animateLeftPanel(shouldExpand: hasMovedGreaterThanHalfway)

    } else if let _ = rightViewController,
      let rview = recognizer.view {
      let hasMovedGreaterThanHalfway = rview.center.x < 0
      animateRightPanel(shouldExpand: hasMovedGreaterThanHalfway)
    }

  default:
    break
}
The pan gesture recognizer detects pans in any direction, but you're only interested in horizontal movement. First, you set up the gestureIsDraggingFromLeftToRight Boolean to check for this using the x component of the gesture velocity.
There's three states that need to be tracked: UIGestureRecognizerState.began, UIGestureRecognizerState.changed, and UIGestureRecognizerState.ended:
- .began: If the user starts panning, and neither panel is visible then shows the correct panel based on the pan direction and makes the shadow visible.
- .changed: If the user is already panning, moves the center view controller's view by the amount the user has panned
- .ended: When the pan ends, check whether the left or right view controller is visible. Depending on which one is visible and how far the pan has gone, perform the animation.
You can move the center view around, and show and hide the left and right views using a combination of these three states, as well as the location and velocity / direction of the pan gesture.
For example, if the gesture direction is right, then show the left panel. If the direction is left, then show the right panel.
Build and run the program again. At this point, you should be able to slide the center panel left and right, revealing the panels underneath. If everything is working... you're good to go!
Where to Go from Here?
Congratulations! If you made it all the way through, you're a slide-out navigation panel ninja!
I hope you enjoyed this tutorial. Feel free to download the completed project file. I'm sure you'll enjoy being stuck in the middle of kitties and puppies!
If you want to try a pre-built library over the DIY solution, be sure to check out SideMenu. For an in-depth discussion of the origins of this UI control (and a trip down memory lane), check out iOS developer and designer Ken Yarmosh's post New iOS Design Pattern: Slide-Out Navigation. He does a great job of explaining the benefits of using this design pattern and showing common uses in the wild.